Administrative Screens
Every system is configured to meet the specific needs of the client, which means that no two systems will look exactly the same. The following descriptions of the Administrative screens are intended to show the pages that are available in a system with both the Learning Management and Performance Management modules installed. The section names and pages are customizable.
The Administrator's Console contains all of the administrative screens for the system.
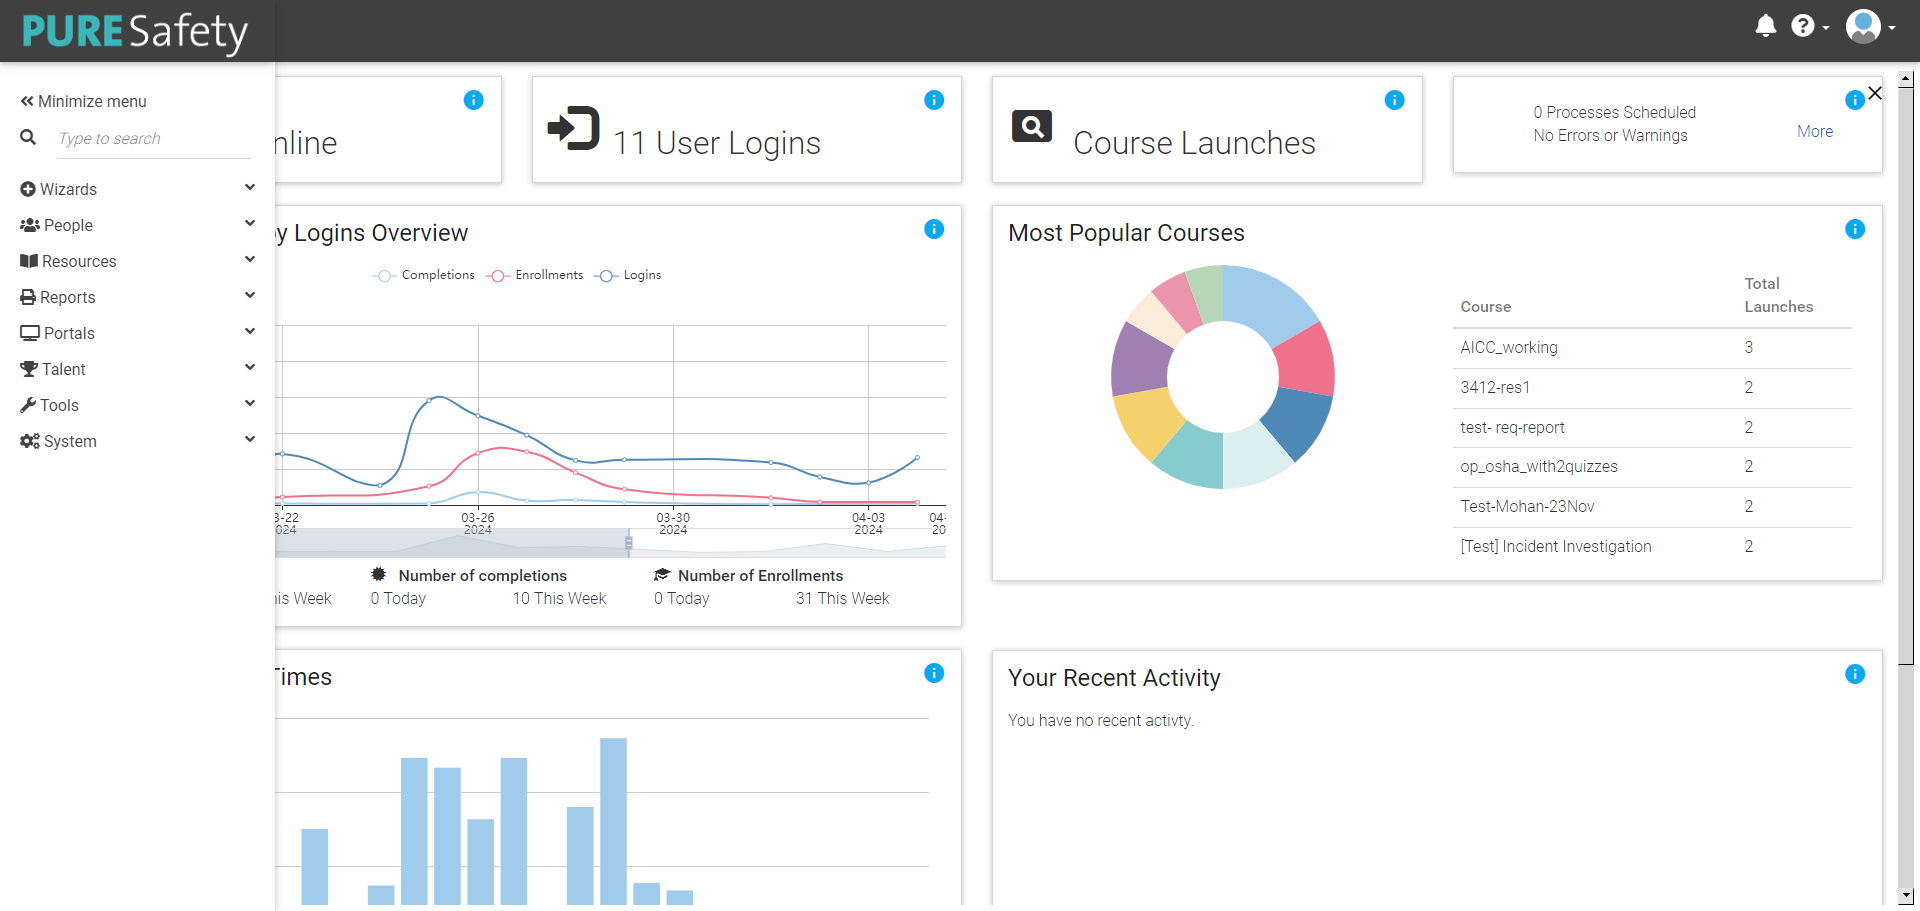
The widgets on the Administrator's Home provide quick access to commonly needed user data. The Navigation Bar gives access to all administrator functionality.
Administrator's Home (Widgets)
Training Activity Overview
This interactive widget shows all completions, enrollments, and logins over a period of time.
Most Popular Courses
This interactive widget counts each course launch per person for the previous 90 days and displays the top 10 most popular courses.
Popular Training Times
This interactive widget counts course launches by time of day.
Your Recent Activity
This interactive widget shows every action administrators in your organization have taken that involves users, resources, or reports over the last calendar day.
Users Online
This informational widget shows the number of users currently logged in to the LMS.
User Logins
This informational widget shows the number of logins to the LMS over the last calendar day.
Course Launches
This informational widget shows the number of courses launched over the last calendar day.
Processes Scheduled / Errors Warnings
This informational widget shows any errors or warnings that have occurred within the LMS, as well as any upcoming reports that have been scheduled.
Navigation Bar
Wizards
- Add New Person: This link gives access to the Add New People wizard.
- Batch Load ILT Classes: Upload class sessions and the associated class enrollments or completions.
- Course Import Wizard: Go here to upload new courses from a variety of sources or quickly import updated content to an existing course.
- Import Facilitated Session Wizard: This feature allows you to upload new classes for facilitated sessions as well as attendance, credit, or enrollments.
- Link Builder Wizard: This feature allows an administrator to create deep links to pages within the LMS and to online courses.
- Import Curricula Wizard: Use the Curricula Import Wizard to upload course catalog curricula and mapping curricula. The levels within the curricula can be defined as well as the resources contained within each level.
People
- Manage Credit and Enrollment: This screen can be used to create enrollments, drop enrollments, and grant completions.
- Maintain People and Security: Use this screen to view or edit all user data including domain and manager information. Various administrative roles can be assigned to people through the Roles and Security tab. NOTE: If you have a data feed, do not manually make any changes to the domains and personnel fields that are part of the data feed. The data feed will always overwrite any manual changes.
- View Person Information: This is a view only version of the Maintain People and Security screen.
- Manage Companies: This screen allows you to add new companies or edit data for existing companies.
- View Companies: This is a view only version of the Manage Companies screen.
- Administer Chargebacks: This function is used to give a user or client a discount on a course that can be applied to other training or to alter transactions before they are sent to a financial system.
- Batch Load Enrollments: This link takes you to the Batch Course Enrollment wizard. Use this feature to mass upload course enrollments and/or completions.
Resources
- Maintain Learning Resources: Use this screen to create/add new courses (resources) and edit existing courses.
- Maintain Facilitated Sessions: Use this screen to add specific class sessions to an existing instructor-led course, to monitor enrollments, and to grant credit for class sessions.
- Maintain Mapping Curricula: Use this feature to create a target audience which will have the LMS automatically "push out" selected resources to that audience.
- Maintain Course Catalog: This feature defines the on-screen organization of resources in the Course Catalog for the defined target audience.
- View Class Calendar: This feature allows administrators to see the end user view of the class calendar.
- Maintain LMS Assessments: This screen can be used to edit existing assessments. All new assessments should be created through the Maintain Learning Resources screen.
- Maintain LMS Evaluations: This screen can be used to create new Level 1 and Level 3 evaluations.
- Administer Likert Scale: Use this screen to create custom Likert scales for your system. These scales can then be used when creating evaluations.
- Manage Fulfilled Resources: Use this screen to view and manage the status of fulfilled resources (physical items that must be delivered to a learner once they enroll in the resource.)
- Maintain Audience Templates: Use this screen to create and edit audiences that can be used throughout the LMS.
- Bulk Quiz Import Wizard: Use this screen to import bulk quiz data.
Reports
- View Report Catalog: This feature allows you to access and run all reports that are available to you.
- View Recent Reports: This feature takes you directly to a list of all reports that you have recently run.
- System Report Queue: This screen allows you to see the status of all reports that have been recently run, or are still running, by users in your organization.
- Administer Reports: This screen gives you access to the Report Wizard (ad hoc reporting tool).
- Administer Report Schedules: Use this screen to make changes to scheduled reports (e.g., frequency, start date, etc.).
- Maintain Report Groups: This screen allows you to create additional group/category names for the Report Catalog.
- Maintain Report Permissions: Here, you can set the permission for who can view and/or run each report available in your system. This screen also allows you to select which report category a report should appear under in the Report Catalog.
Portals
- My Dashboard: This screen provides administrators quick access to their own dashboards.
- Administer Portal Pages: This screen allows administrators to create new portal pages and edit existing portal pages, including the Home page.
Social
- Manage Groups: Use this screen to create new groups and edit existing social groups.
- Manage Reported Items: Use this screen to authorize or deauthorize reported items.
- Manage SPOC Groups: Use this screen to create new groups and edit existing groups within a SPOC resource.
Talent
- Administer Competencies: Use this screen to create and edit competencies. Competencies can be tied to behaviors and/or skills assessments within the LMS to determine if a user is competent in specified training areas.
- Administer Competency Categories: Use this screen to create and edit competency categories. These optional categories will appear on the Administer Competencies screen.
- Administer Job Profiles: This screen allows you to create and manage job profiles. Job profiles can include job zones, direct reports, and audiences.
- Administer Rating Scale: This screen allows you to create or edit rating scales for measuring performance (e.g., Meets Expectations/Does Not Meet Expectations, Novice/Median/Expert, etc.).
- Manage Outstanding Assessments and 360s: This screen allows administrators to view the status of all 180 and 360 review forms that have been started.
- Administer Categories: Use this screen to create new and edit existing developmental and performance goal categories.
- Administer Cycles: This screen allows you to manage cycles of time for talent and goal completion. (e.g., start date, deadlines for employee and manager reviews, and end dates).
- Administer Goal Templates: This screen is used to create and manage goal templates, which allow the same goal(s) to be set and required for multiple users.
- Administer Perspectives: Perspectives, or goal types, are an optional feature that can be used to help categorize goal templates on reports. Use this screen to create and manage perspectives.
- Administer Targets: This screen allows administrators to create a list of Key Performance Indicators (KPIs) that can be used on target goal types. Some examples of KPIs include numbers, percentages, days, and dollars.
- Query Talent Data: This feature allows you to locate specific users in your system by selecting filters pertaining to talent data.
- Administer Structures: This screen allows you to manage the structure of talent profiles.
- Administer Talent Pools: This screen allows you to create and edit specific talent pools that users can be added to.
Tools
Due to your site's configuration, all listed pages may not be available in your system.
- View Session Transactions: This allows an administrator to view the AICC or SCORM interaction data for a selected user and selected resource.
- xAPI Statement Viewer: This screen allows you to view xAPI statements from various learning resources. It includes the user name, verb, object name, object type, and time stamp.
- Maintain Announcements: This screen allows you to add and assign audiences to announcements that appear in the Announcement widget.
- Maintain Teams: This screen allows you to create various teams within the LMS. These teams can then be utilized on various screens throughout the LMS.
- Maintain Certificates of Completion: This screen allows you to create one or more certificates of completion for your system. Once created, specific resources can then be associated with a completion certificate.
- Maintain Content Categories: This screen allows you to create content categories for your system. Once created, a resource can be associated with one or more content categories.
- Maintain Secondary Content Categories: This screen allows you to create secondary content categories for your system. Once created, a resource can be associated with one or more secondary content categories.
- Maintain Document Libraries: Use this screen to create new document libraries and to determine which roles can upload to each document library.
- Maintain Venues: Use this screen to create venues that can be used for facilitated class sessions in your system.
- Maintain Cancellation Policies: Here you can enter the cancellation policies for facilitated sessions into your system. Once created, you can then associate a class session with a cancellation policy when needed.
- Maintain Logistics Forms: Use this screen to create logistics forms for your system. Once created, you can then associate a class session with a logistics form when needed.
- Maintain Media Types: Use this screen to create resource media types for your system. The text for media type-specific notifications can also be entered here if desired.
- Maintain Providers: Here you can enter the resource provider information for your system.
- Maintain Certifying Authorities: This screen allows you to manage certifying entities within the system.
- Maintain Credential Types: This screen allows you to record a credential type, such as license, diploma, certification, etc.
- Maintain Credentials: Use this screen to create a record of credentials that can be linked to a user's profile.
- Maintain Virtual Classroom Providers: This screen allows you to enter the necessary account set-up information for each virtual classroom account that will be utilized in your system.
- Maintain Global Discounts: This screen allows you to enter discount codes that can be utilized for all resources within your system.
- Maintain Competencies: Use this screen to create and edit competencies. Competencies can be tied to behaviors and/or skills assessments within the LMS to determine if a user is competent in specified training areas.
- Manage Assessment Templates: Use this screen to create and manage templates that will be used for multiple assessments.
- Manage Videos: Use this screen to view all videos that have been uploaded into your system and upload additional videos if desired.
- Manage Badges: This screen allows you to create and manage badges that users can earn based on completion of training.
System
- View System Usage: Quickly access states that show how your system has been utilized over a selected time period.
- Maintain Custom Data Tables: This screen gives access to the custom data tables in your system.
- Maintain Custom Text: This screen gives access to the custom text in your system. Custom text is not available on any of the new portal pages.
- Maintain Translations: This feature is available only in systems that are globalized. Enter the translated text for various words throughout your system.
- View Email Queue: Here you can view all emails that the system has queued, sent, or held over the past 90 days. Selected messages can also be resent if necessary.
- View Current User List: View a list of all users currently logged into your system.
- View System Status: This screen allows you to view activity within your system over various periods of time.
- Maintain Menu Items: Use this screen to view and create menu items for the end-user screens in your system.
- Setup Administrator Console: Use this screen to determine which screens each security role can access in the Administrator's Console.
- Maintain System Default Notifications: Use this screen to edit the various default notifications available in your system.
- View Scheduled Processes: This screen allows you to view a list of all processes scheduled to occur within your system.
Related Links
Navigating the Admin Console